Posts: 1
Threads: 1
Joined: Mar 2017
City: Orlando, fla
Hey guys, I was hoping for some help with a radio I'm working on. This is my first antique radio restoration. I have a good deal of experience with electronics, but mostly on cars. The unit is a Philco 47-1230. I have already restored the cabinet and cleaned everything up pretty nicely. I've also replaced any nasty looking wiring. So at this point the unit turns on and all the bulbs except one light up. It plays A.M. pretty clearly, with just a little bit of a drone in the background. There's also pops and other interference when you turn some of the nobs. There's no F.M. at all. When I turn the record player on the motor spins, but the arm seems to be held up by something. Anyways, I am currently trying to get the unit sounding clearer and also playing F.M. stations. From the research I have done I ame to the conclusion that I should replace the Caps. the only problem is I don't know what part numbers to use or really what it is I'm replacing. Any help would be greatly appreciated in finding out what parts to use or how to replace the caps as I have no experience with anything like this on a car

Posts: 182
Threads: 5
Joined: Feb 2017
City: Cedar Rapids Iowa
Hi 8250bubby - I'm currently working on a 47-1230 myself (
http://philcoradio.com/phorum/showthread.php?tid=16407). I've taken tons of pictures for documentation and marked them up with notes where appropriate. I'm new to this as well (not new to electronics...very experienced with that, but new to restoration) so I'll let others weigh in on specifics for what you need to do. I do know that you need to replace all the paper capacitors and the electrolytics. I ordered my caps from
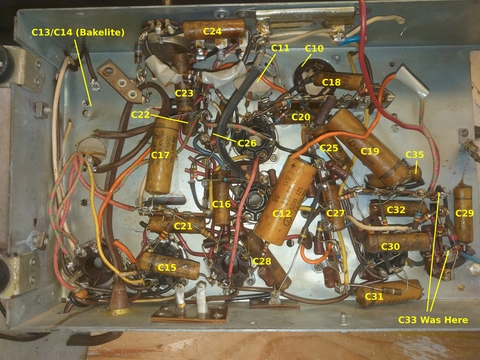
http://www.justradios.com. Here's the picture I took of the bottom side of the main chassis with all the paper caps marked. There are a couple of parts missing from this picture since I haven't put them back in yet (output transformer, bakelite caps).

The designators on this are from the Sam's Photofact for this unit. You'll see them labelled differently on other schematics (Riders?). I can send you the full size version if you'd like.
Let me know if you need any specific pictures or other info.
Rich
Posts: 5,170
Threads: 274
Joined: Nov 2012
City: Wilsonville
State, Province, Country: OR
Welcome to the Phorum!

Sounds like you are getting good advice from criageek. Get hold of a good schematic. A few bucks at
http://www.philcorepairbench.com/schematics.htm will get one. Nostalgiaair.com also has some grom Riders for free, though sometimes less readable.
Posts: 182
Threads: 5
Joined: Feb 2017
City: Cedar Rapids Iowa
Thanks for the input klondike98! I just need to make a minor correction...I think it's nostalgiaair.org (as opposed to .com). Here is the link to the 47-1230 info:
http://www.nostalgiaair.org/Resources/606/M0013606.htm
Rich
Posts: 182
Threads: 5
Joined: Feb 2017
City: Cedar Rapids Iowa
Hey 8250bubby - Ignore the picture I posted above showing where all the capacitors are located. As I'm digging into it to do the re-cap I'm finding that some of these are incorrect. I'll post the correct update when I'm certain it's accurate.
Rich
Posts: 5,170
Threads: 274
Joined: Nov 2012
City: Wilsonville
State, Province, Country: OR
(03-24-2017, 05:20 PM)criageek Wrote: Thanks for the input klondike98! I just need to make a minor correction...I think it's nostalgiaair.org (as opposed to .com). Here is the link to the 47-1230 info: http://www.nostalgiaair.org/Resources/606/M0013606.htm
Thanks Rich, you're correct... .org

Posts: 182
Threads: 5
Joined: Feb 2017
City: Cedar Rapids Iowa
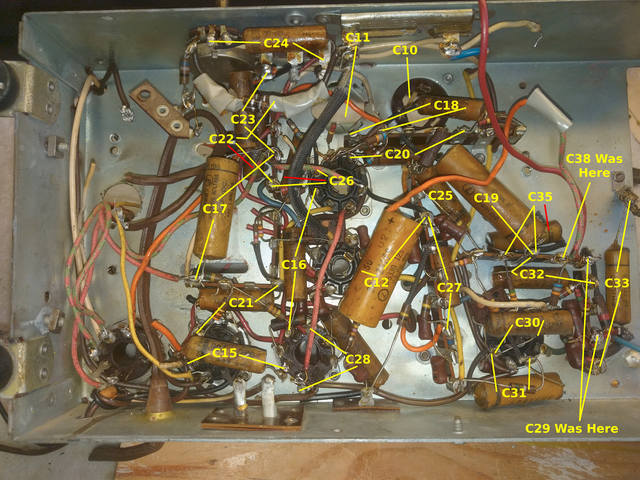
Looks like the original poster may have forgotten about this thread, but in case anyone else comes across it and is looking for the correct capacitor layout, here it is. Again, these designations correspond to the Sam's Photofact for the 47-1230. If I get time I might create one for the Riders designations as well.
Rich


![[-] [-]](https://philcoradio.com/phorum/images/bootbb/collapse.png)


