Philco 38-620 'Big Bullet' cabinet refinishing
Posts: 21
Threads: 7
Joined: Apr 2017
City: Weston, CT
I just got back from a long weekend away, and while I was gone I saw a Philco 'big bullet' radio on display- but not for sale. I've always considered these radios to be an iconic design- one of the best designs of the 30's, but have never owned one. The day after I got home, I was browsing things for sale locally and found this. It's a model 38-620:
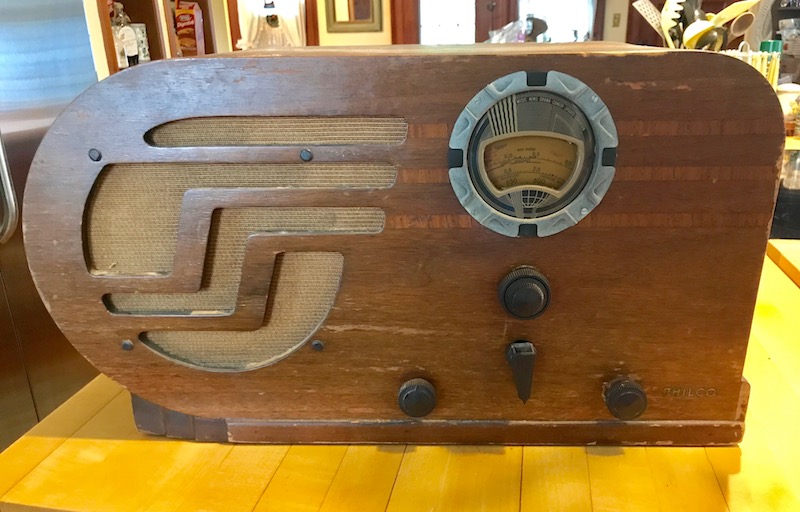
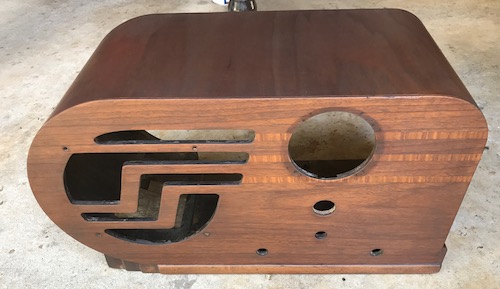
It's unfortunately missing the surround that goes around the dial as well as the glass.
But otherwise is complete and the cabinet is not missing any veneer. The grill cloth is in good condition. Even the chassis is complete, original and fairly clean, though things are so close together underneath it kind of scares me! After I removed the chassis I found the tube diagram and model label underneath, loose in the cabinet.
Since I had a great experience doing my 38-8 console's cabinet and learnt a few things along the way, I figured I would do the same here and post some updates as I work on it so others can see the progress.
It appears that originally the base, and portion underneath the arch on the left side were almost the same shade of brown as the rest of the cabinet. I am debating whether I want to go slightly darker to give it some contrast... or stick with something more authentic...
Posts: 5
Threads: 0
Joined: Jan 2017
City: Johnstown, Ohio
I will look forward to your progress. Cabinet restoration is next on my list of things to tackle.
Good luck with it.
Posts: 21
Threads: 7
Joined: Apr 2017
City: Weston, CT
Today I did a fair bit of work on the cabinet... with 0000 steel wool and lacquer thinner I removed the old finish. This seems to be the best method, I've found other people online seem to use quicker methods, citrus stripper and such... but this seems to work for me.
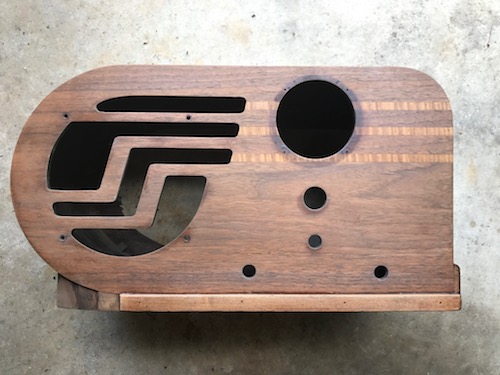
Next I sanded it... for my 38-8 I had been using 600, and then 800 grit sandpaper. This took forever, and I went through a lot of sandpaper, and it still wasn't as smooth as I hoped. I did a fair bit of reading online and someone recommended using 400 or 320 grit first, very lightly, followed by 600. This is what I did for this radio...
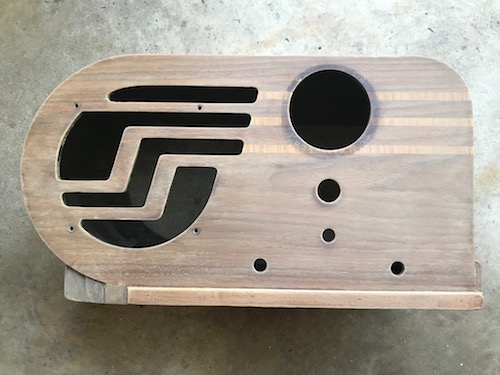
Next I grain filled.
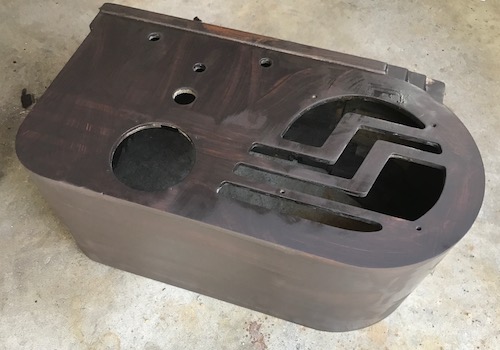
In the last photo, you may be able to see a couple small dings on the edge of the top, just above and to the right of the dial. I was debating whether to fill these with wood filler or leave them. I decided I would leave them, as I wanted to leave this looking like a 79 year old radio in 'good condition for it's age', not a brand new radio with no imperfections.
The next nice day I will do some more work on this...
Posts: 751
Threads: 91
Joined: Nov 2015
City: Jonesboro
State, Province, Country: AR
Nice work so far  . If you're curious, I produced a video series documenting the restoration of my 37-610 Bullet. Here's a link to my website with the videos.
http://jeffsradios.weebly.com/youtube-videos.html
Blessings,
Jeff W.
Jonesboro, Arkansas
http://jeffsradios.weebly.com
God loves you as you are, not as you should be, because none of us are as we should be. - Brennan Manning
Posts: 102
Threads: 14
Joined: Jul 2017
City: Bakersfield, CA
Okay, a "rookie" question. What do you mean by grain filled? What product did you use and what was your technique? I can always learn from what others do! Thanks!
Posts: 751
Threads: 91
Joined: Nov 2015
City: Jonesboro
State, Province, Country: AR
I use Constantine's Paste Filler, Walnut toned. The paste fills in the open grain of the wood. I use a plastic putty knife to apply it over the whole cabinet, then putty knife off the excess, then gently sand with the grain to remove further excess. Once this is done, the open grain is filled, and when you apply the toner/lacquer, you have a nice flat surface. This eliminates any dimpling effect you see when viewing in the light. I didn't know about this when doing the video, but it was suggested that a sanding sealer is used before the grain filler. This prevents the tone from the grain filler from darkening the wood too much. See my thread here on the forum that discusses some of the things not covered in the videos.
http://philcoradio.com/phorum/showthread.php?tid=15434
Blessings,
Jeff W.
Jonesboro, Arkansas
http://jeffsradios.weebly.com
God loves you as you are, not as you should be, because none of us are as we should be. - Brennan Manning
Posts: 4,894
Threads: 54
Joined: Sep 2008
City: Sandwick, BC, CA
If there isn't any wood missing where those small dings are, you can sometimes bring them back out with a damp cloth and either a soldering iron or a clothes iron, I usually try that first before resorting to wood putty or other repairs.
Regards
Arran
Users browsing this thread: 1 Guest(s)
|
|
Recent Posts
|
|
Philco model 38 code 121 not receiving signal.
|
| Thank you sir. Yes I feel good and also relieved because this one's been weighing on me a bit.Stormlord5500 — 11:18 AM |
|
Philco model 38 code 121 not receiving signal.
|
| It feels good don't it? Good luck on the rest.Paul Philco322 — 11:06 AM |
|
Philco model 38 code 121 not receiving signal.
|
| I've reinstalled the coil. Now IT'S ALIVE!!!!!!
I fired up my TinySA on signal generator mode and set it to 1400Kc and ...Stormlord5500 — 11:01 AM |
|
Philco model 38 code 121 not receiving signal.
|
| Yes, Walmart, right up there with Fluke.RodB — 11:00 AM |
|
PT 6 chassis screws size???
|
| it certainly won't be metric! SAE threads were all that was known then. Take care, - GaryGarySP — 10:58 AM |
|
Philco model 38 code 121 not receiving signal.
|
|
I think this thing is way more accurate than my Walmart DMM. :DStormlord5500 — 08:19 AM |
|
Philco model 38 code 121 not receiving signal.
|
| Thankyou for the kind words sir.
I double checked it with my component tester and it read 2.7 ohms at .02mH.Stormlord5500 — 08:14 AM |
|
PT 6 chassis screws size???
|
| Hello bridKarl,
that sounds right or maybe 8/32 .
Sincerely Richardradiorich — 01:00 AM |
|
PT 6 chassis screws size???
|
| Have this done except for missing chassis screws.
It looks like 1 inch 6/32 sheet metal screw may work but can anyone s...bridkarl — 10:32 PM |
|
Philco model 38 code 121 not receiving signal.
|
| Hello Stormlord,
Well done on rewinding that coil it turned fairly good for your first one.
Sincerely Richardradiorich — 09:12 PM |
|
Who's Online
|
| There are currently no members online. |

|
 
|


![[-] [-]](https://philcoradio.com/phorum/images/bootbb/collapse.png)


