Welcome Guest! Be sure you know and follow the Phorum Rules before posting. Thank you and Enjoy! (January 12) x

Thread Closed
Thread Rating:
  • 0 Vote(s) - 0 Average
  • 1
  • 2
  • 3
  • 4
  • 5

41-290 On/Off Switch
#1

I'm working on a 41-290 that has a bad on/off switch. I found a switch at Lowe's that was recommended as a replacement (p/n 1884U), but cannot get it to function properly due to the plunger being longer. Is there any info about repairing the old switch or does someone have a recommendation for a replacement?

Thanks!!
#2

You should follow the procedure outlined here:

http://www.philcoradio.com/notebook/41226.htm
(scroll about 1/3 of the way down the page)

Note that you have to remove the plunger and associated hardware from the switch; the photos in the link above will illustrate what needs to be done.

--
Ron Ramirez
Ferdinand IN
#3

I had looked at this awhile back, but the bad switch on the radio is not riveted together so the back of the new switch can't be attached to the old plunger assembly. The old switch is crimped together.

Was a good thought though!
#4

Can you take a photo and show us the switch on your set? The setup should be basically the same.

--
Ron Ramirez
Ferdinand IN
#5

    I'll try.
#6

Might be wrong, but looks like you should be able to pop that spring clip right off with a thin blade screwdriver...
#7

That isn't the original switch, the original was riveted to the back of the switch assembly. Unfortunately, this means the original actuator is gone as well.

You can do a workaround by using that bracket someone fabricated for the replacement switch, and installing a small switch from Radio Shack in its place. I do not remember the part number and don't have time to look it up, sorry.

--
Ron Ramirez
Ferdinand IN
#8

Thanks for the help. If I can't find anything on Radio Shack, there's always Mouser.
#9

This switch is similar to the switch I used a couple times before I discovered the Lowe's switch:

http://www.radioshack.com/product/index....Id=2062542

At the time (a few years ago), this was the only push-on, push-off switch I could find at Rat Shack. Now, they also list an SPST switch which is what you really need:

http://www.radioshack.com/product/index....Id=2049717

I thought I had written a post on using that switch, but I can't find it now. Hopefully you'll be able to improvise something that will work.

--
Ron Ramirez
Ferdinand IN
#10

Thanks!! I'll try the second one. I think they stock it here in town. I'll Let you know if it works. Give me a few days.
#11

The switch I used for my 41-280 was almost identical internally to the original. I got it at Ace Hardware, but I imagine that style of switch is commonly available, at least for now. The Ace stock number is 33494 or 33495. The only difference is the color of the push button, brass vs. chrome. You'll throw that part away, anyhow.

You may need to use the spiral plunger and spring from the new switch, since yours probably doesn't have the original, having been fitted with a different style of switch. It took me a bit of tinkering, but I got it to work reasonably easily.

I wrote a post on it years ago, in this thread. http://philcoradio.com/phorum/showthread.php?tid=7296

John Honeycutt
#12

            The fix was easier than I first thought. Given the construction of the push button switch assembly, it would have required some major disassembly to install a switch that was held in place by a nut. Also, I didn’t just want to epoxy a new switch in place as that can be a mess to deal with if the switch would ever need to be replaced in the future.

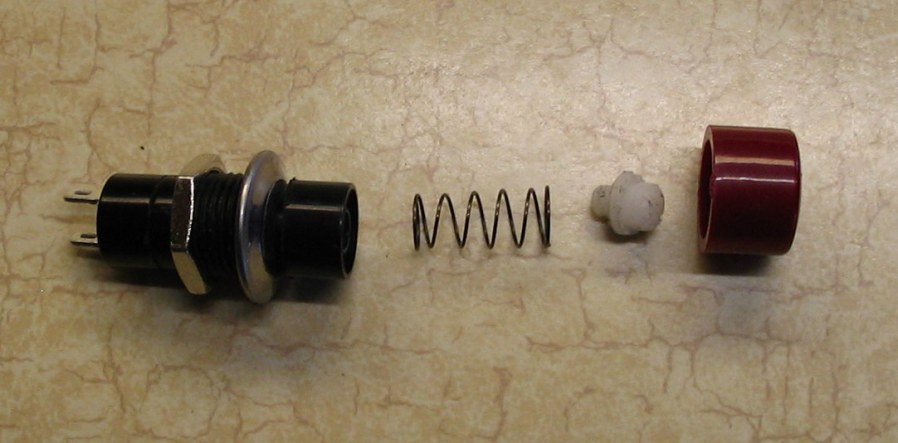
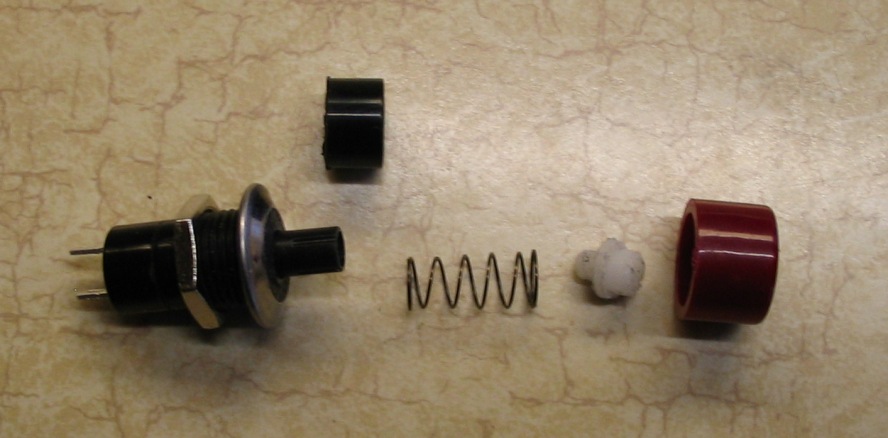
I used the Radio Shack 275-0011 switch recommended by Ron. I started by pulling the red pushbutton off and unscrewing the small white spring retainer and spring from the plunger. The black switch body had sort of a collar around the plunger, I guess to provide some protection for the plunger. Anyway, I cut this off with a razor saw as shown in the second picture. This made it possible for the plunger to fit into the hole in the back of the push button assembly. The length of the plunger was just the right length for the metal actuator to operate the switch properly.

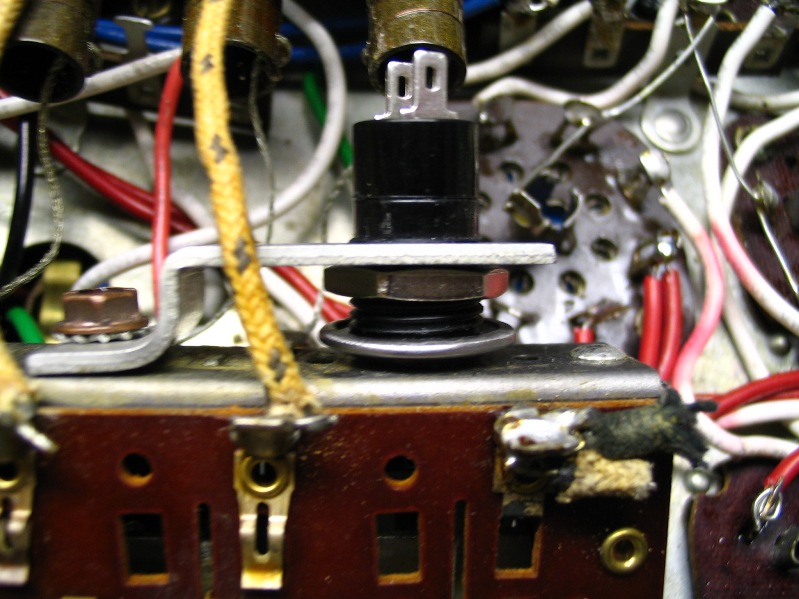
As I mentioned, I didn’t want to simply epoxy the switch in place, so I positioned the switch retaining nut at the end of the threaded portion of the switch and used that as a stop that the original bracket could contact to keep the switch in place. This is shown in the third photo.

The whole thing took less time to do than it’s taken to describe it. Hope my description makes sense.

I haven’t powered it up yet as I have a bunch of work left to do. I will put just a bit of epoxy on the nut and the bracket to make sure they don’t come loose.

As an aside, the original bracket and switch (shown in a previous post) certainly looks like a “factory” job. The bracket wasn’t handmade, it was obviously stamped out on a machine. Also, there was no adjustment for how far the plunger protruded into the push button assembly – the depth was determined by the dimensions of the bracket. The only adjustment was from side to side. The hole for the switch was elongated to allow lateral adjustment to insure that the plunger was centered in the hole. Given how hard it would have been to replace a stock switch that might go bad, I wonder if Philco came up with this as a quicker, lower cost alternative?

Thanks for everyone’s input!!


Users browsing this thread:
[-]
Recent Posts
Philco model 38 code 121 not receiving signal.
That's true. Of course If I were to get a vtvm I'd probably have to sink money in to it to get it working right. Probabl...Stormlord5500 — 08:44 PM
Philco model 38 code 121 not receiving signal.
A DMM is good enough. One rarely has to measure indictance, but if you do, short of getting a serious LCR meter (I hav...morzh — 07:35 PM
Testing a speaker and output transformer Trutone A2-G
You guy's are right on. I found a broken wire on the speaker plug that I replaced and all is well now. Have better volu...murf — 03:43 PM
Philco model 38 code 121 not receiving signal.
I need to get a vtvm. I think that little component tester is just more accurate. Plus it shows the inductance which is ...Stormlord5500 — 03:07 PM
Philco model 38 code 121 not receiving signal.
I use a pair of Mastercraft brand DMMs from Canadian Tire, from what I read most of those DMMs use the same main chip re...Arran — 02:36 PM
Philco model 38 code 121 not receiving signal.
Thank you sir. Yes I feel good and also relieved because this one's been weighing on me a bit.Stormlord5500 — 11:18 AM
Philco model 38 code 121 not receiving signal.
It feels good don't it? Good luck on the rest.Paul Philco322 — 11:06 AM
Philco model 38 code 121 not receiving signal.
I've reinstalled the coil. Now IT'S ALIVE!!!!!! I fired up my TinySA on signal generator mode and set it to 1400Kc and ...Stormlord5500 — 11:01 AM
Philco model 38 code 121 not receiving signal.
Yes, Walmart, right up there with Fluke.RodB — 11:00 AM
PT 6 chassis screws size???
it certainly won't be metric! SAE threads were all that was known then. Take care, - GaryGarySP — 10:58 AM

[-]
Who's Online
There are currently 1850 online users. [Complete List]
» 1 Member(s) | 1849 Guest(s)
Avatar

>