Welcome Guest! Be sure you know and follow the Phorum Rules before posting. Thank you and Enjoy! (January 12, 2025) x

Thread Closed

Black wooden feet for Zenith 6S222
#1

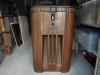
Now that I finished my 37-610T my next project is a Zenith 6S222 cube. The major issue I have is that the black painted wooden feet are missing. I have a line on someone parting out a 5S218 and want to be sure that the feet used on those are the same as on my 6S222. Can anyone confirm this?

Here is a link to some photos of my 37-610T restoration:

http://demandred.dyndns.org/540i/gallery/album17

Thanks,

Steve D
#2

You sure done one fantastic job on this set Icon_biggrin
#3

From what research and pics . They are the same . looked at several pics perfect match . Icon_wink
#4

I have both Zenith Cubes. The feet on both are 2" wide, but the length varies. The length on the 6S222 is 9 & 5/8" whereas the length on the 5S218 is 8 & 7/8". The basic design of both sets of feet is identical, so if you don't mind the feet being a little short on your 6S you'll be fine. You will have to drill some new holes in the feet. By the way, the 6S is vastly superior to the 5S, electronically.
#5

Some more stuff on your Zenith 6S222. It is well worth a good restoration and you should be happy with the results, but be prepared for a speaker reconing job. The location of the speaker, in the top of the radio where it collects dust and is subject to heat from the tubes, is not conducive to long cone life.
#6

I finally finished the Zenith 6S222 and would like to share my project. I picked up this Zenith 6S222 at the 2009 Kutztown show and did buy those feet from the 5S218 which fit fine. This link shows the progress:

http://demandred.dyndns.org/540i/gallery/album18

The original chassis had been worked on some time before but it still needed a though cleaning, cap replacement, and alignment. Also the dial was in great shape but I fabricated new pilot light shades and repainted the white dial enclosure as it had yellowed. The cabinet was in very good shape other than yellowed scratched lacquer. It only needed stripping, sanding, and a very light mahogany stain on the end strips to bring out the color. I decided to make the edge trim a dark brown for contrast, which may or may not be original but it is what I wanted.

The finish is six coats of Mohawk clear lacquer, wet sanded with 2000 grit paper, and polished with 3M hand glaze. Lastly a friend had a large can of 40 year old of Butchers wax which I applied two coats of. The speaker is not original but is at least a period electrodynamic Jenson, and the output transformer was burned up so I got a 7K primary impedance type from Edcor transformers. They custom make transformers and are half the price of Hammond.

Lastly the radio came with the loop antenna shown which is from another probably newer Zenith but it fits and works great so I left it installed.

My next project is a Sonora RCU-208 which seems complete but in a bit worse condition than the Zenith, followed by a Philco 600, a Philco 42-321, and a Silvertone 1671.

Thanks,

Steve D

#7

That's a beautiful job on the 6S222 -- both on the chassis and cabinet. Wish my stuff looked that good!
#8

Thanks, 37-670. That was my best job so far, I keep learning with each radio I do. Now I am working on a Sonora RCU-208. Hope it comes out as good. I am in the process of winding a universal winding coil to replace one of the coils of the 1st IF transformer as it was burned. We have some Stevens winding machines here at work so I should be OK. The hardest part so far was determining the turns per layer and the machine gear ratio.

Steve D


Users browsing this thread: 1 Guest(s)
[-]
Recent Posts
54C Complete Teardown/Rebuild
Hello Roy, here is this one sincerely Richardradiorich — 12:45 AM
54C Complete Teardown/Rebuild
Richard, Had grabbed it already but thank you just the same.  I find myself wanting to find some way to block out the...glyphmon — 12:03 AM
54C Complete Teardown/Rebuild
Hello roy, here is a link to the schematic . Sincerely Richardradiorich — 11:54 PM
54C Complete Teardown/Rebuild
Richard, The Silvertone 2014 also is a transformerless set, so I am incorporating a 1:1 600 ohm audio isolation transfo...glyphmon — 11:37 PM
Preliminary work on wife's Silvertone 2014
Did an alignment today which was interesting.  IF alignment went great, almost all was already spot-on.  Adjusting on th...glyphmon — 11:35 PM
54C Complete Teardown/Rebuild
The main problem with adding a Bluetooth input is that this set lacks a traditional power transformer to isolate it from...radiorich — 11:19 PM
54C Cabinet Refinish
I started stripping this cabinet before it got super chilly out because I knew I wasn't going to be able to work on ...glyphmon — 11:18 PM
54C Complete Teardown/Rebuild
While I'm waiting to wrap up the final steps on my wife's Silvertone 2014, I started disassembly on the next project.  O...glyphmon — 11:07 PM
Preliminary work on wife's Silvertone 2014
Hello roy, that great news glad it worked out for you !! Sincerely Richardradiorich — 10:50 PM
Preliminary work on wife's Silvertone 2014
Safety caps arrived today.  Soldered one in and had a successful first power-up.  No magic smoke escaped and it tunes in...glyphmon — 09:53 PM

[-]
Who's Online
There are currently 1720 online users. [Complete List]
» 2 Member(s) | 1718 Guest(s)
AvatarAvatar

>