Welcome Guest! Be sure you know and follow the Phorum Rules before posting. Thank you and Enjoy! (January 12, 2025) x

Thread Closed

RCA 128
#1

Hey everyone,
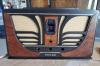
Earlier this year I picked up an RCA 128 on Ebay. This is one of the radios I've wanted to get since I was in High school, so I was thrilled to get it! Until I actually got it, that is. Turns out the chassis was in poor condition, along with a shorted out power transformer! Disappointed, I put it off to the side, until, by luck, I came across a chassis for an RCA 226 on Ebay. After some research it turns out the 226 is the console version of the 128 and the chassis's are identical Icon_thumbup I bought the 226 with the idea of using the parts from it to repair my 128 chassis. After receiving the 226, it was in such good shape that I am now going to use it to replace the 128's sad gut's and use the original for spare parts. I'm now working on the chassis. My question is, does anyone have any tips on what is good to use to clean dirt from the chassis? there is no rust on it but it does have 75 years of grime stuck to it! Also if there are any RCA experts on here, Which is the correct dial face to use? My 128 came with a yellow dial which I think may be a repro and my 226 came with a very dark red dial which looks original. Any input would be great, thanks!
Kevin
#2

The early production dials were dark cranberry colored, and tough to see through. I used brighter 6V bulbs in my 263, but you have to be careful that you do not burn holes in the two light diffusers that are in front of each bulb. The later dials were a light amber color. If your dial is really a light yellow/tan, it may be a rock-sea replacement. These tend to be way too light.

I would use the dark red dial if your 128 dial is one of these replacements. Or check with Mark Oppat at oldradioparts.net for a good replacement for the light amber dial. I have used his dials for several of my resto jobs and they are very satisfactory.
#3

If your diffusers are scorched or burned through, a plastic milk carton makes an effective and economical replacement.

Mike Koste
Gobs of Knobs
Zucksville, PA
#4

There are as many ways to clean up a chassis as forum members. Smoky grease may come off with a little ammonia with a rag. An old toothbrush and qtips also helps in crevices. Moving on to something stronger, paint thinner (make sure area is ventilated,) or rubbing alcohol. Some like to use GoJo, pumice or auto rubbing out compound, tootpaste, it goes on and on. Beware that chassis stamps and labels may be ruined, so take some pictures first. Be careful not to get any debris into the tube sockets, those you should spray with deoxit. Whatever you do, let everything dry out for a day or so before initial testing begins.
#5

37silverstreak Wrote:My question is, does anyone have any tips on what is good to use to clean dirt from the chassis?

If the chassis in not really dirty and the metal is not corroded the best is to use a mixture of two most powerful solvents - water + alcohol = vodka. Icon_smile
A bottle of Stoly will last long and smells good. Can be also used for tubes and other components.

Otherwise you should be able to find a lot of cleaning stuff in any kitchen...

Leonid


Users browsing this thread: 1 Guest(s)
[-]
Recent Posts
Philco P45-6365 Universal Transformer Instruction Manual
Can anyone guide me to where this may be found?GRG — 03:00 PM
54C Complete Teardown/Rebuild
I don't think that I have encountered a 12Z3 before, curious how it uses one of those but includes a #43, which is a 25 ...Arran — 02:17 PM
HiFi (Chifi) tube amp build - but my own design.
It's the other forum. I'm also in DIY, but mostly read there. Honestly, I kinda jumped into this without much thought to...TV MAN — 10:43 AM
Philco 71 Code 125
Hello,  I am in need of a schematic for this radio. Mine has the three separate circular tube shields and a shadow me...dconant — 08:06 AM
Stromberg Carlson 1500 Squeal
And life just keeps getting more complicated.dconant — 07:57 AM
54C Complete Teardown/Rebuild
Hello Roy, here is this one sincerely Richardradiorich — 12:45 AM
54C Complete Teardown/Rebuild
Richard, Had grabbed it already but thank you just the same.  I find myself wanting to find some way to block out the...glyphmon — 12:03 AM
54C Complete Teardown/Rebuild
Hello roy, here is a link to the schematic . Sincerely Richardradiorich — 11:54 PM
54C Complete Teardown/Rebuild
Richard, The Silvertone 2014 also is a transformerless set, so I am incorporating a 1:1 600 ohm audio isolation transfo...glyphmon — 11:37 PM
Preliminary work on wife's Silvertone 2014
Did an alignment today which was interesting.  IF alignment went great, almost all was already spot-on.  Adjusting on th...glyphmon — 11:35 PM

[-]
Who's Online
There are currently 2086 online users. [Complete List]
» 2 Member(s) | 2084 Guest(s)
AvatarAvatar

>