RCA 110K2 Unexpected project
Posts: 1,275
Threads: 44
Joined: Nov 2017
City: Menlo Park
State, Province, Country: CA
Hi folks
Another radio in need of attention. Some years ago a good friend of ours bought this RCA console at a very elevated price from an antique radio market in Southern California.
When they moved house, the radio was kindly given to us, and stored carefully - I never had a chance to look at it until now. Since then, it had been moved by professional movers who "did a number" on several items, and this set also got special attentions. It isn't so bad, but annoying.
Today I pulled it out hoping to tinker & tune about. After unwrapping the movers packaging I was rather crestfallen. The thread "who looks under a chassis" sprang immediately to mind...
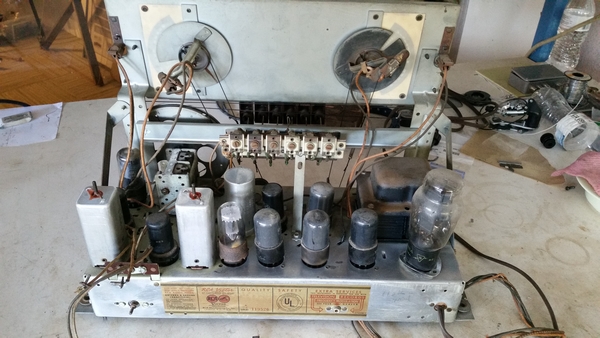
The restorer did a rather ugly and seemingly incomplete job - orange drop caps here and there, but seemingly lots of tubular paper caps untouched. Wires to the speaker are brittle and frayed and to me, it seems a bit of a lashup. On the plus side the dial cords have been replaced.
So, where to begin? With this or the Western Air Patrol. I thought this set was going to be an easy addition to the collection... I have started by ordering schematic and service info.
Cheers
Ed
I don't hold with furniture that talks.
Posts: 4,611
Threads: 51
Joined: Sep 2008
City: Sandwick, BC, CA
Aaak, another set that fell victim to a hack "restorer", at least it hasn't been given the cheesy plastic screw terminal addition for antenna and ground like Russ' A.K., it's amazing how many people think that bright Sprague Orange drops are somehow an improvement, even if they're pigtailed on. If it's an RCA I wouldn't "order" a schematic from anywhere, it's such a well known brand that plugging the model number into a search engine will probably find you anything you want to know. Barring that I more then likely have the service info for this set in one of the U.S RCA manuals to scan if need be, the Riders version is posted on Nostalgia Air. http://www.nostalgiaair.org/pagesbymodel...014715.pdf
Regards
Arran
(This post was last modified: 03-11-2018, 12:12 AM by Arran.)
Posts: 1,275
Threads: 44
Joined: Nov 2017
City: Menlo Park
State, Province, Country: CA
Thanks Arran - that gets me started.
I looked again last night. The dial cords have not been touched I suspect (probably a good thing) But I need to work out the mechanism, as something isn't working quite right. Sometimes the drive goes slack and the pointer slips off the scale.
Oh, and the #%^$ moving company lost all the knobs. So there's my first expense.
It should come together nicely, and I feel somewhat responsible to recover the set, since it was a gift. However, I don't see the same level of electronic or chassis quality as with the older Philco I have worked on.
Next thing will be to test transformers and field coils, and see that we have all windings in one piece.
I don't hold with furniture that talks.
Posts: 1,117
Threads: 21
Joined: Jan 2014
City: Wellborn Florida
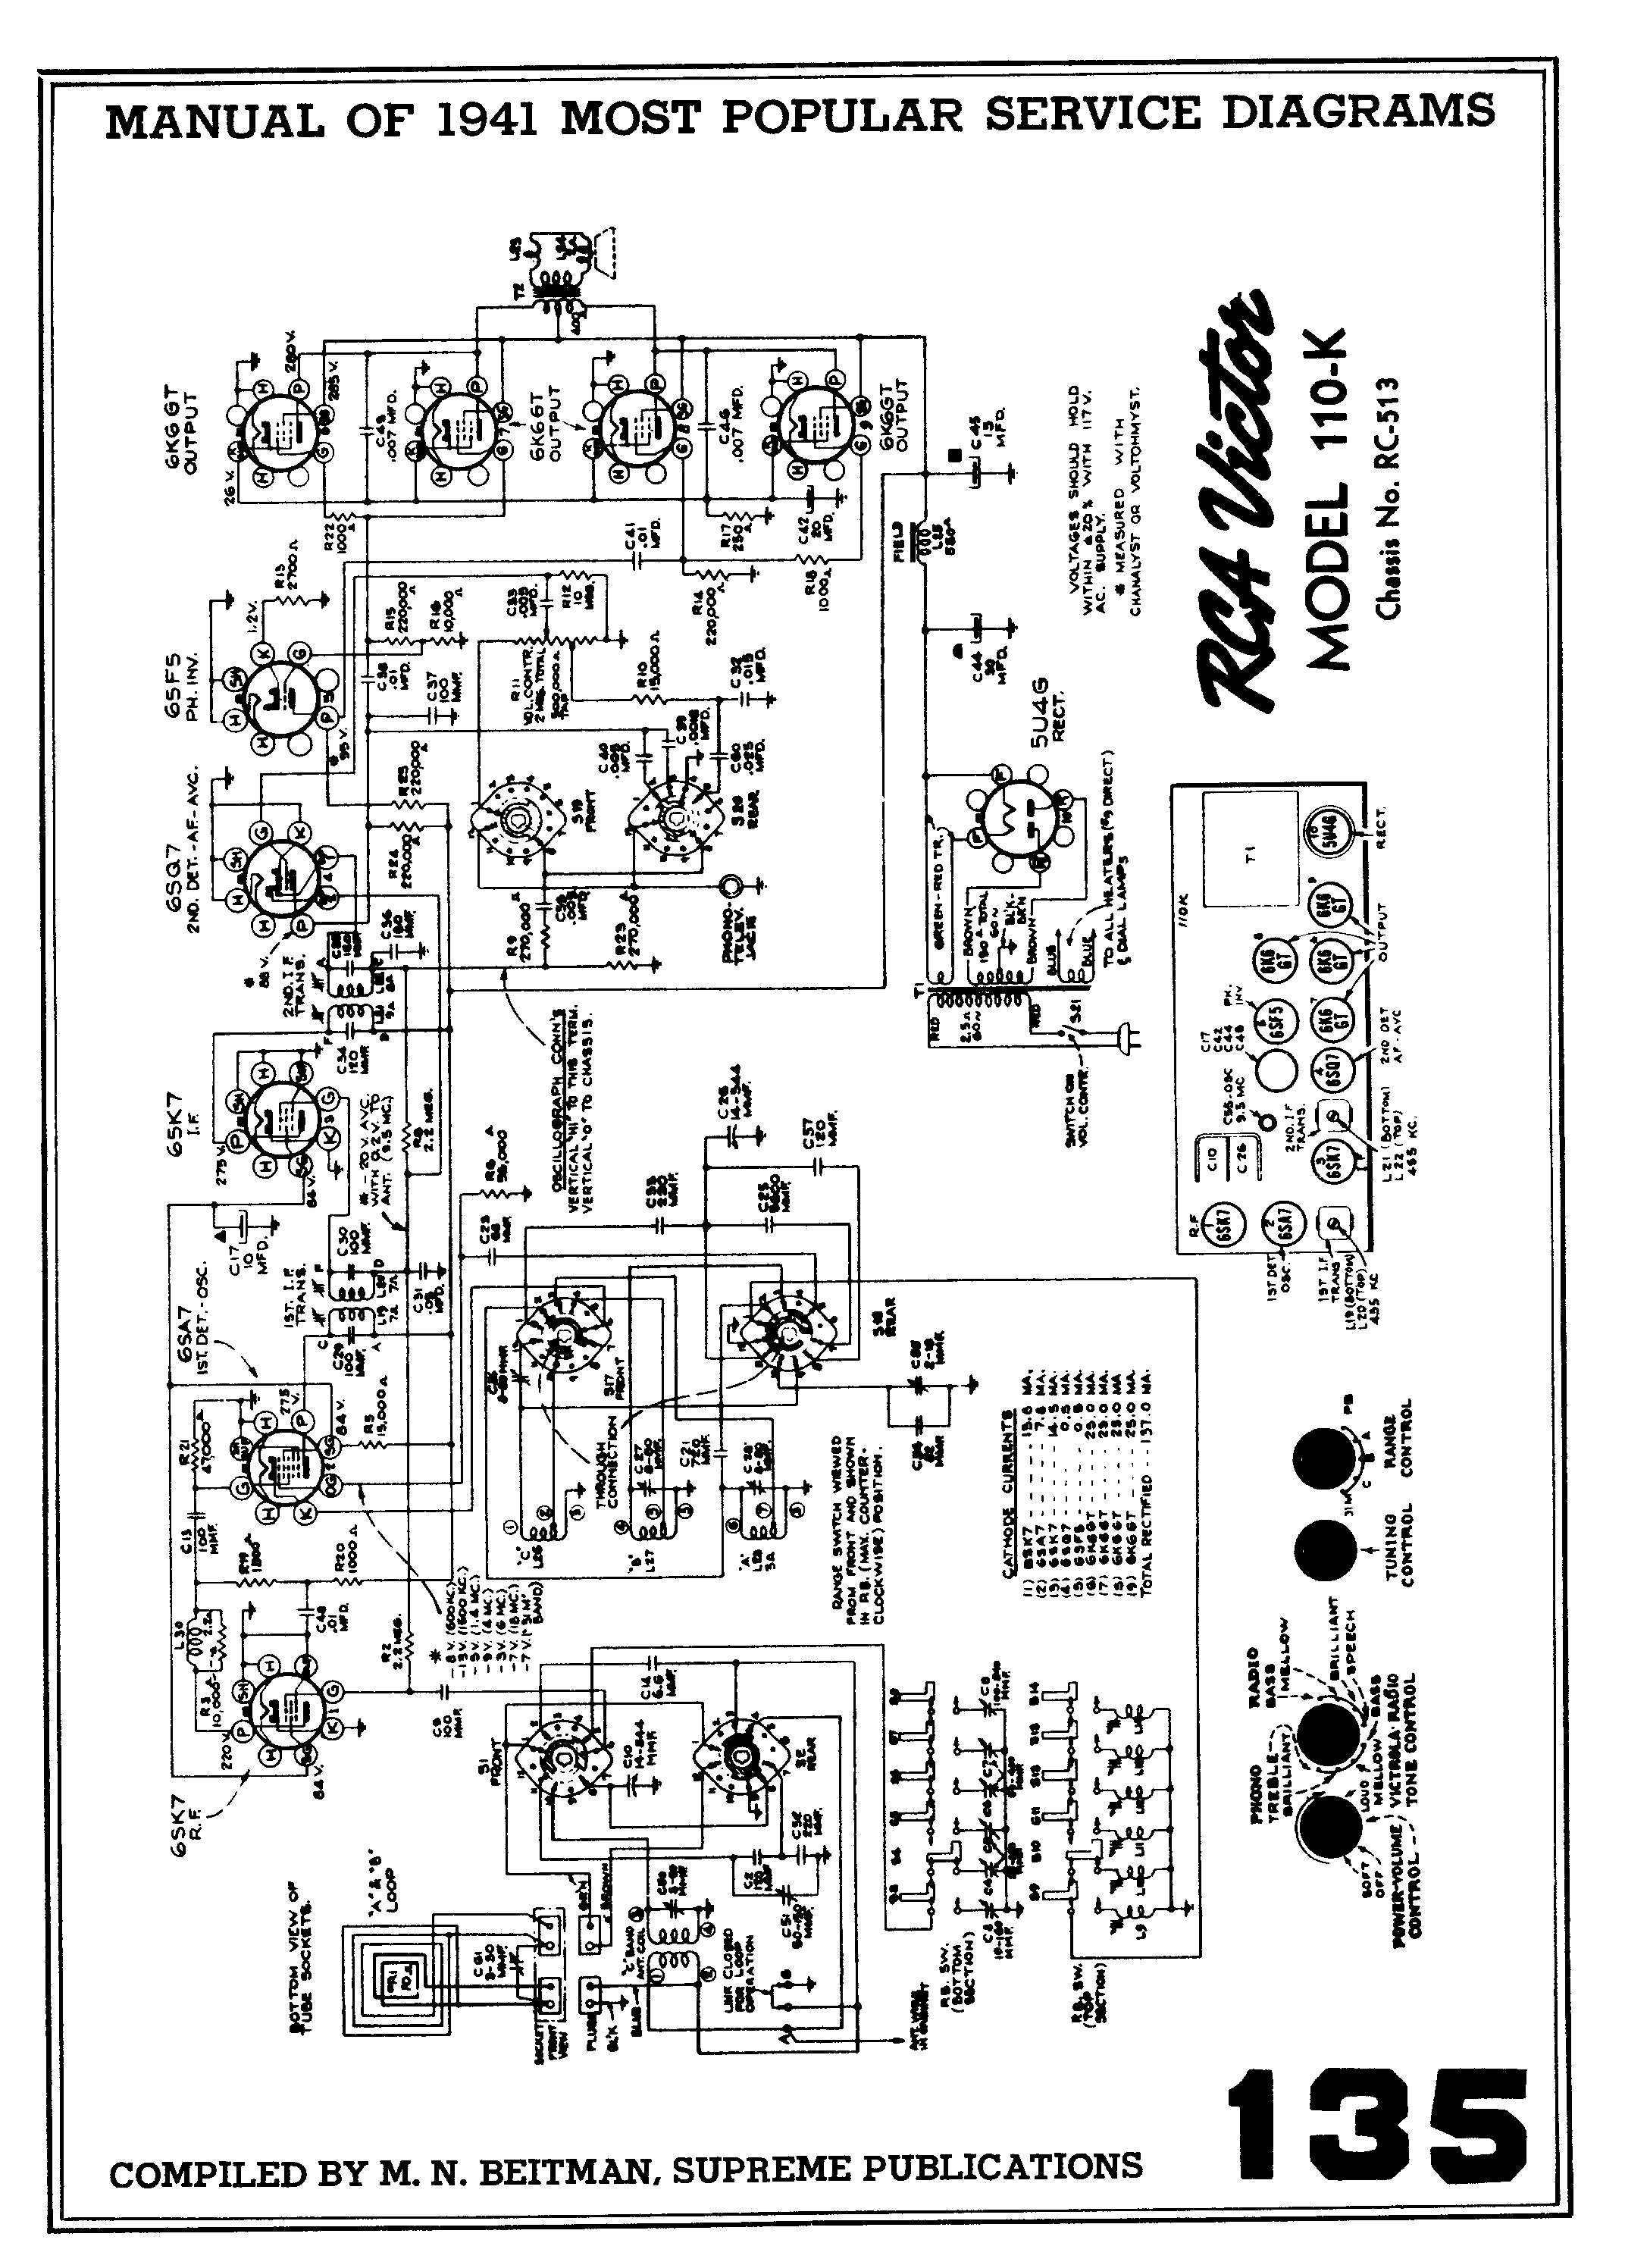
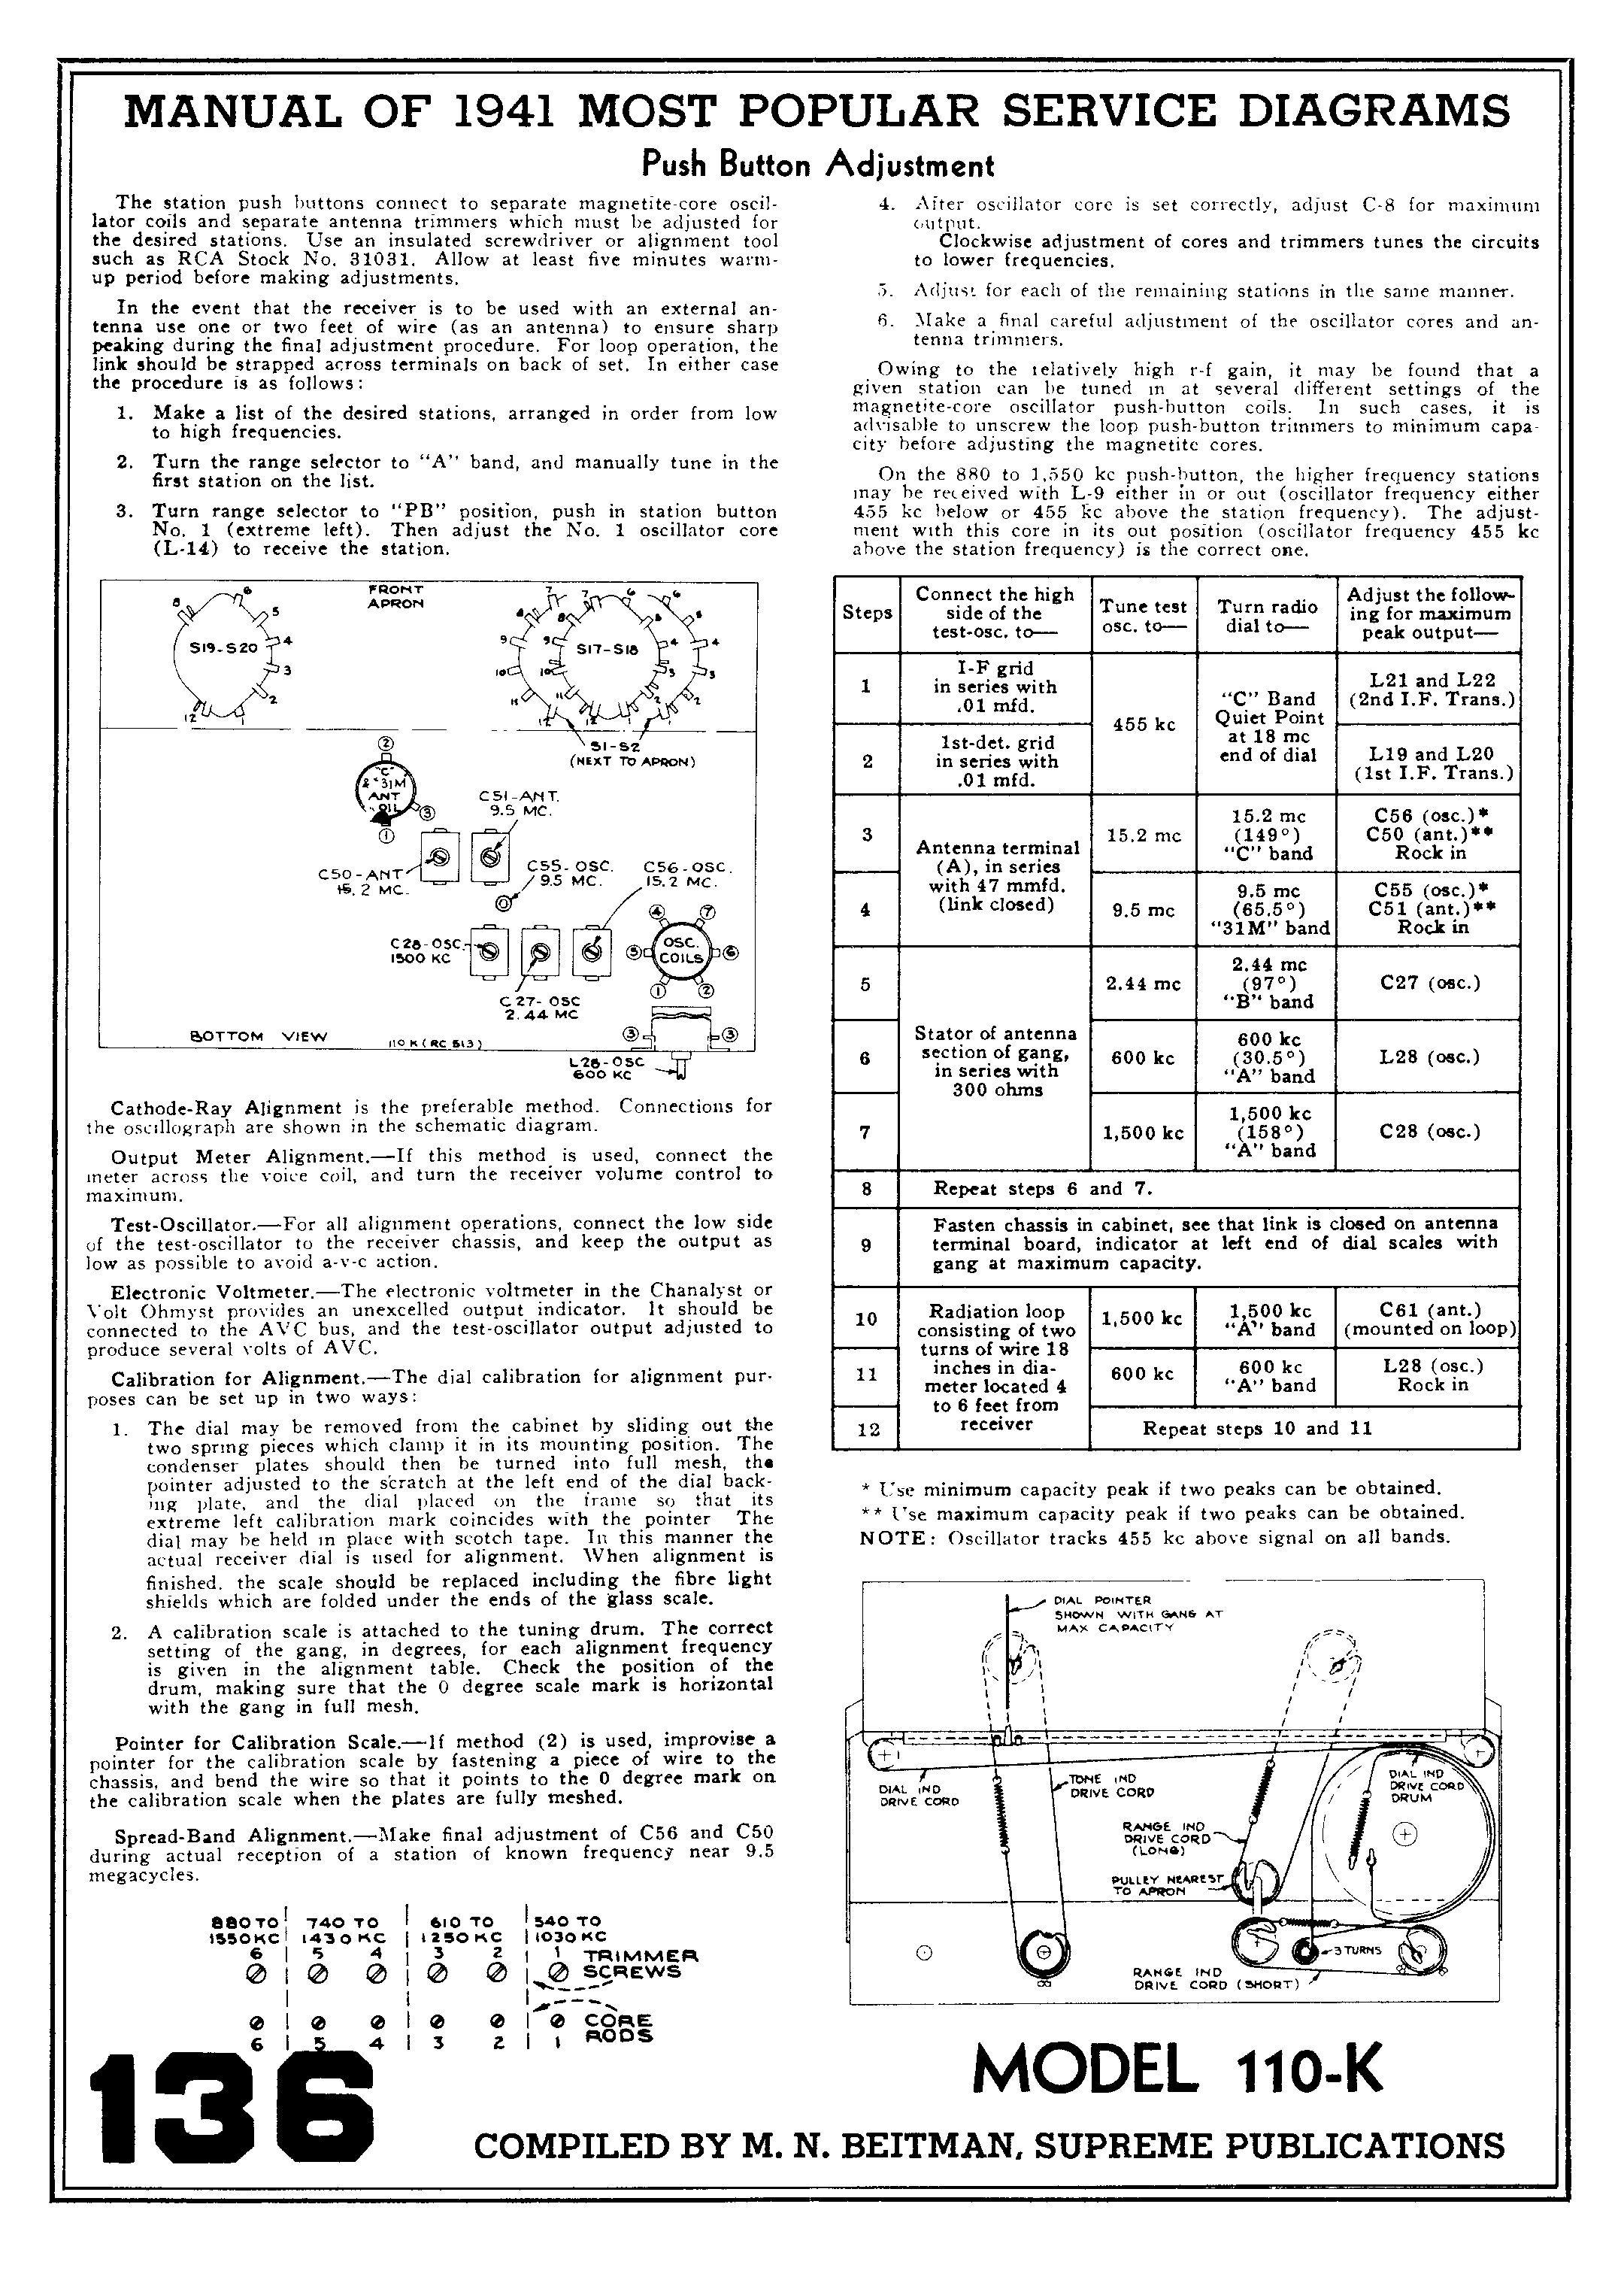
Hope this info helps.David
Posts: 4,611
Threads: 51
Joined: Sep 2008
City: Sandwick, BC, CA
I wonder how they lost the knobs? I know the kind, then have half shafts, and the half portion is about 3/4'' deep, and they have a steel spring inside, so it's not like there isn't anything to grip them onto the shafts. I haven't moved in some time time but I can't recall the movers loosing a knob on a console, in fact they wrapped the cabinets in moving blankets and then wrapped tape around them to hold them in place, so it just wasn't possible for that to happen. If they are missing I have a feeling that someone swiped them at some point along the way, unless the chassis was just sitting inside bouncing around rather then being bolted down. The good news is that these 1940s style RCA knobs are fairly common, especially the smaller size ones, they were used all through the 1940s on everything from radio phono combos to AC/DC sets, I've seen them in bulk lots of knobs on fleabay, as well as being listed as RCA knobs, avoid the radio butcher Polecat on there unless you want to pay $20 a knob (or just on principle), keep your eyes open for broken RCA Bakelite sets that still have the knobs, those can turn up anywhere.
The service info David posted came out of Beitmans, which shows that they were a fairly popular set when they were new, it's nice that they have dial cord diagrams but they don't seem to give the length of the cord you need. Dial cords can be tricky if you aren't used to dealing with them, once or twice I have have found that the cord doesn't travel correctly when following the factory service info and had to improvise slightly. I have also found that if you can't get actual dial cord that braided fly line backing for fly fishing works as a good substitute, though it is stretch so you may have to shorten it to get the right tension, 15 lb test or higher is best.
Regards
Arran
Posts: 1,275
Threads: 44
Joined: Nov 2017
City: Menlo Park
State, Province, Country: CA
Thanks David - that's great 
Thanks again Arran.
Indeed during the move, the chassis was not bolted down (I was not around to supervise any of this). The set was wrapped in cardboard and plastic film, but things were quite out of place when I removed the "packaging". My wife wonders if they were removed for safekeeping and misplaced... Anyway, I have ordered replacements.
More tinkering today (and I was really intending to complete the back for the Philco). I sorted the dial mechanism - removed gunge off the cord with parts cleaner, lubricated the pulley system very lightly and it is now all working well. Ditto the waveband and tone indicators. I also started to look at what could be used to remove a yellow corrosion/deposit from the chassis. A mix of vinegar and denatured alcohol seems to work quite well for this, and I'm working my way slowly along the metalwork.
Electrically things are in OK shape - the field coil and output transformer show continuity and correct resistance. However I'm still shaking my head at the lacklustre restoration effort. A quick appraisal so far shows:
Many caps not changed
Frayed wire all over the place
Random types of new caps tacked in place, "j hooked" to the old component leads, and otherwise bodged in.
Electrolytic caps not replaced at all! It is still relying on the old 4 section can. No chance this was restuffed as the solder joints appear to be factory age, unlike the replaced parts.
I have not decided whether to try and replace the multi section can with something similar, wire new caps beneath the chassis, or restuff the original can.
At this point, I need to step back, take a deep breath, and then write a list of all the areas wanting attention.
But first, the Philco needs the last touches.
Cheers
Ed
I don't hold with furniture that talks.
Posts: 1,275
Threads: 44
Joined: Nov 2017
City: Menlo Park
State, Province, Country: CA
One thing I'd like to do (besides getting some pictures on this thread) is to remove the tuning condenser for a good clean. Holding me back is the fact that there are copper grounding ribbons spot welded from the frame to the chassis. I'd have to lose this original connection method. Interestingly, the chassis includes two tabs where it appears the ribbons might have been soldered in earlier production runs. Similar tabs are used in this manner at other locations.
What would the experts here suggest?
Cheers
Ed
I don't hold with furniture that talks.
Posts: 1,117
Threads: 21
Joined: Jan 2014
City: Wellborn Florida
Copper welding way above my skill set. You could use number 10 or 12 copper for your rod and something like peterson blue flux and do a copper braze. Might get by with a propane torch or mapp gas. To be honest I would not want to have that much heat inside a radio. Melting point of copper 1984.32F. David
Posts: 1,275
Threads: 44
Joined: Nov 2017
City: Menlo Park
State, Province, Country: CA
Somwhere on the web I saw a video in which a big transformer and a capacitor were employed to make a serviceable spot welding apparatus. That could work, but I really don't need another project!
If I take things apart, a solder connection is by far the easiest method.
Thanks
Ed
I don't hold with furniture that talks.
Posts: 4,611
Threads: 51
Joined: Sep 2008
City: Sandwick, BC, CA
I would be surprised if the copper braid ground straps were spot welded, copper doesn't usually weld to steel, and RCA's practice was to solder the ground straps to the chassis. To undo them you will need a large soldering iron as the chassis tends to act as a heat sink, something like an old Amercan Beauty at 100 Watts or more, unless you are good with a propane torch.
Regards
Arran
Posts: 1,275
Threads: 44
Joined: Nov 2017
City: Menlo Park
State, Province, Country: CA
I'll look closer over the weekend and grab a pic or two. The straps don't look soldered.
I don't hold with furniture that talks.
Posts: 1,275
Threads: 44
Joined: Nov 2017
City: Menlo Park
State, Province, Country: CA
Lots of minor tinkering jobs today, and that included some re-gluing of the RCA's cabinet. Thankfully there is only one area that required attention, but it always seems that clamping the simplest things turns out to be harder than expected.
With the glue drying, I tested 0000 wire wool, followed by a gentle wipe of shellac on a small part of the top. It looks like this finish will respond nicely to some TLC, without recourse to a major sanding.
I don't hold with furniture that talks.
Posts: 1,275
Threads: 44
Joined: Nov 2017
City: Menlo Park
State, Province, Country: CA
Well, I was sort of right about the finish... But I found more evidence of the previous restorer's care and attention here. It has been given a light wipe over the original finish with shellac, quite clearly with very little preparation. 0000 wire wool takes off the "new" layer to reveal the original finish. Luckily this means the original decals are safe  .
This morning, I spent some time sanding the top and the curved transition to the dial with 220 grit to remove the poorly adhered stuff, and level off the areas where the original finish has flaked. Then I'll fill the grain in the really exposed areas before testing a refinish. This is the most noticable area of the radio so it will be interesting to see how it can be recovered.
Also, I need to re coat (paint?) some areas that have a thick dark brown finish. The areas are like moulding at the transition between panels. What would folks here recommend?
I don't hold with furniture that talks.
Posts: 4,611
Threads: 51
Joined: Sep 2008
City: Sandwick, BC, CA
Shellac comes off with alcohol very easily with a rag or paper towels. As for shaded finish the Mohawk company has some fairly good shaded lacquers in psray cans, I think that Deft may have as well but I have never seen the Deft stuff.
Regards
Arran
Posts: 1,275
Threads: 44
Joined: Nov 2017
City: Menlo Park
State, Province, Country: CA
Thanks Arran. I'll look into it. The areas are small for the dark trim, so a brush on product might be better if one can obtain a good finish with it.
Here are a few long promised pics:
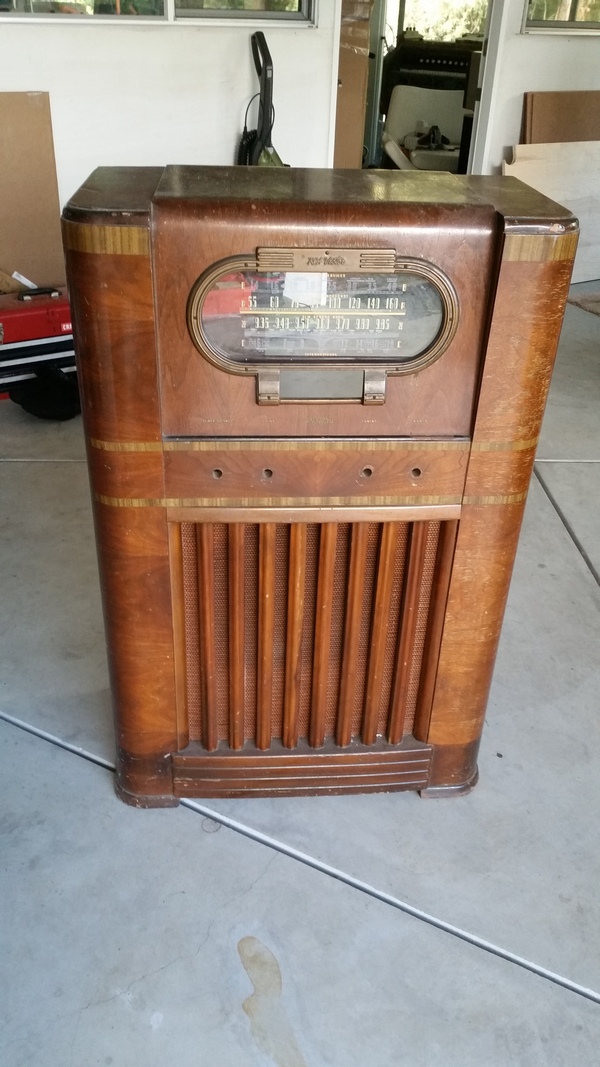
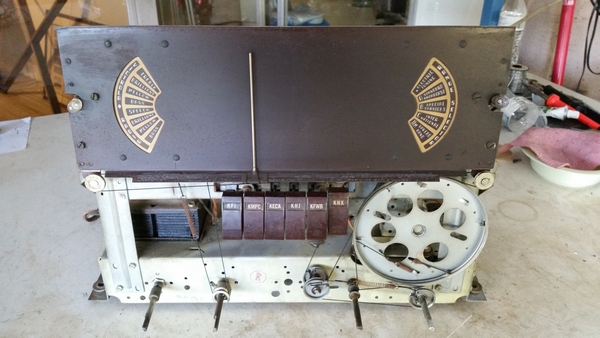
I don't hold with furniture that talks.
Users browsing this thread: 1 Guest(s)
|


