Philco model 70 rebuild - by Tim P.
Posts: 1,083
Threads: 73
Joined: Jan 2014
City: Annapolis, IL
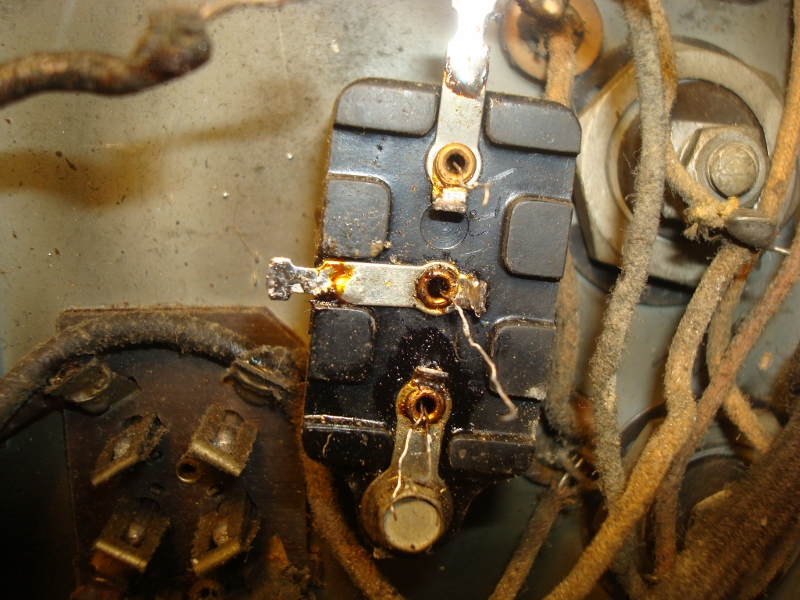
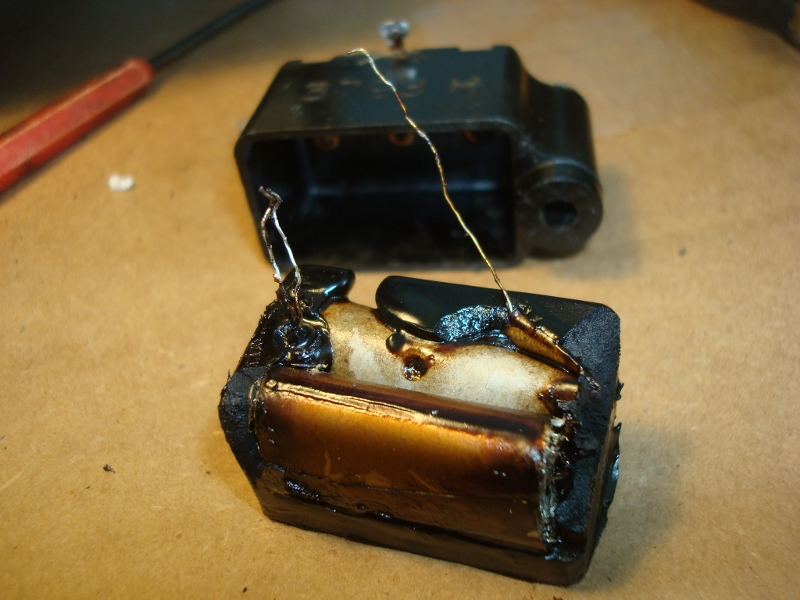
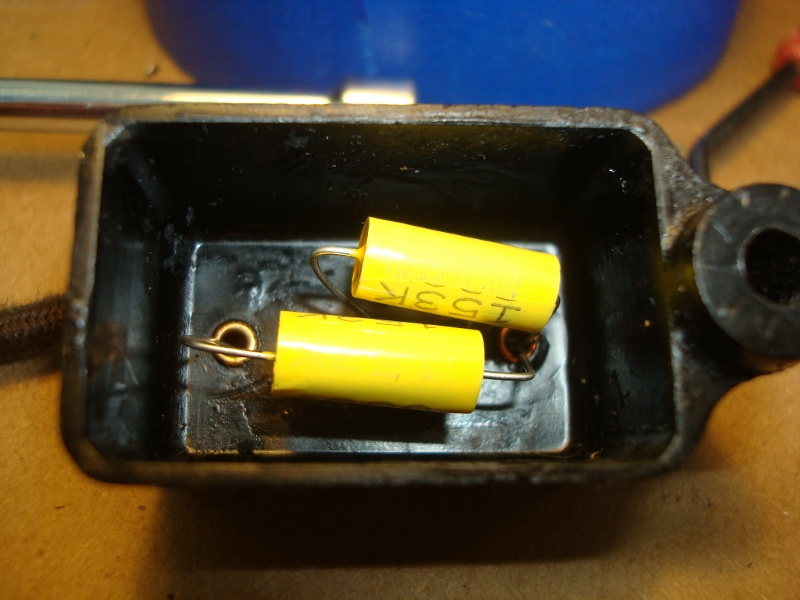
I got the bakelite blocks rebuilt last weekend. Morzh's trick of using an allen wrench, heat gun and leaving them in the set worked great! I warmed them for about 10 seconds, clipped and unsoldered the small wires and the guts pushed right out with a small allen wrench. Installed the new caps, put the block screw back in - done!
The culprit...this one I had unsoldered the wires to replace a power cord, the rest, I left soldered in the set, and could turn them enough to remove the guts, and install the new caps.

The guts...

The rebuild...

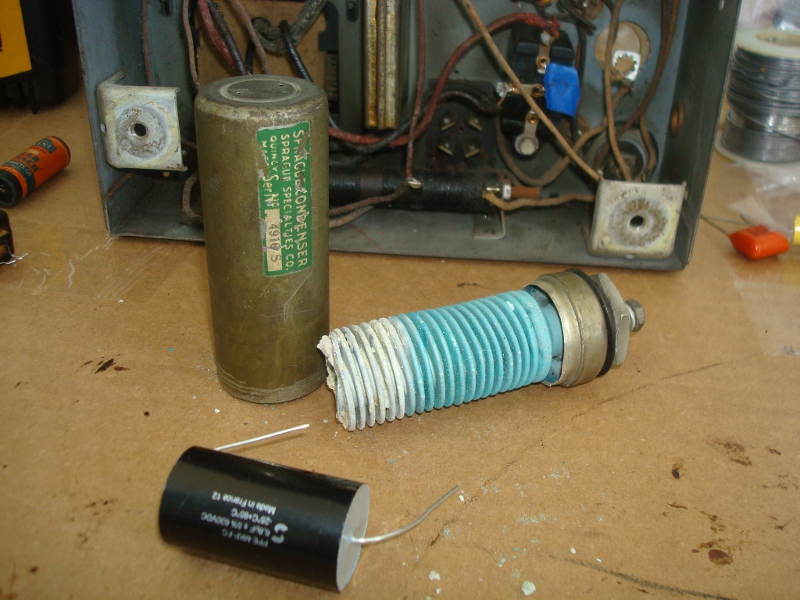
I started on the electrolytics yesterday and have one cut open. It came right apart. I used a tubing cutter. Now, how do I put it back together?? What do you use? I fear if I just glue it, it will snap off the 1st time I bump it. I think I am going to try the 6.8mf poly as was suggested by Greg. I have some resistors to replace. These are large. Anyone know what wattage to use?
If I could find the place called "Somewhere", I could find "Anything" 
Tim
Jesus cried out and said, "Whoever believes in me , believes not in me but in him who sent me" John 12:44
(This post was last modified: 02-11-2014, 12:06 PM by TV MAN.)
Posts: 15,307
Threads: 532
Joined: Oct 2011
City: Jackson, NJ
Tim
Could you post a pic of what you have so far with your lytics?
The further action depends on where you cut and what cap it is.
If it is what I had in 90 (in 70 I had replacements and they are different, they are aluminum Cornell Dubilier and yours are the copper tube types), you need to clean the tube inside from oxidation if it is there (mine was full of blue crystals - soaking in vinegar worked well).
I cut them right along the groove at the base, at the upper border of the groove (again look in my 90 topic).
Then when all is ready I simply applied a small bead of JB weld close to the rim of the tube and then inserted the base in it.
Make sure the base will fit inside first, if it does not, use something to make it fit (usually it does, simple smoothing/deburring the edge of the cut will just do the trick).
It will not snap as the epoxy remains somewhat flexible (but not too much). However do not screw or unscrew them grasping the tube after that, this will twist it off of the base if the effort is too large (and it might be). And the length of the groove is about 3-4 mm so it will go inside the tube for good enough length to hold well when glued. It will stand up to bumps and knocks, just like I said - do not use it to twist the cap off.
-------
As for the resistors, I made it a rule for all high-ohms to be 1W rated so then I do not have to ask the question.
You could simply look at the dropout:
say 270V is B+ and then the plate voltage chart says 80V (which is not always true - remember, they used low-impedance meters to measure so in reality the dropout is way less but to be conservative this is good).
Your dropout is thus 190V, and if you have 100K resistor your real dissipated power will be 0.36W (and this is the worst unreal case) so if you use 1W rated you are just fine.
(This post was last modified: 02-11-2014, 11:41 AM by morzh.)
Posts: 1,083
Threads: 73
Joined: Jan 2014
City: Annapolis, IL
Here are some shots of the progress. My electrolytics are the Sprague brand. I had thought about filing the top a little and overlapping.

If I could find the place called "Somewhere", I could find "Anything" 
Tim
Jesus cried out and said, "Whoever believes in me , believes not in me but in him who sent me" John 12:44
Posts: 15,307
Threads: 532
Joined: Oct 2011
City: Jackson, NJ
Tim
look here
http://philcoradio.com/phorum/showthread...106&page=2
This is exactly what I had in the 90, and I could not re-use the central contact, as the thread was crumbling and falling off of the central insulator.
So I do not know, even if the thread is intact, if you could reuse yours as I am not sure how to connect the capacitor to it.
As for the putting it back together, you cut it exactly like I did, so you will just push the base inside the tube when all is ready, having put some epoxy inside the tube around the inner perimeter (a small bead, a full circle of it right at the edge).
PS. What is that blue thing across your lowe backelite (I think it is the line filter one?). Are you placing them on top? Place them inside.
(This post was last modified: 02-11-2014, 11:53 AM by morzh.)
Posts: 1,083
Threads: 73
Joined: Jan 2014
City: Annapolis, IL
Ah-ha! That thread is just what I needed! No, it is masking (yes, blue is what I had from our remodel) tape to label things. The new caps are all inside. I added a few shots in a previous post to show the rebuild. Although I seriously thought about putting the new filter electrolytics under the cans... but I really want this rebuild to be good, and last a long time.
If I could find the place called "Somewhere", I could find "Anything" 
Tim
Jesus cried out and said, "Whoever believes in me , believes not in me but in him who sent me" John 12:44
(This post was last modified: 02-11-2014, 12:03 PM by TV MAN.)
Posts: 1,562
Threads: 56
Joined: Nov 2008
City: Sedona, AZ/Placentia/CA
Tim, nice choice for the e-cap, I really like those Solen Fast Caps for low values and high voltage. They have worked well for me well. I know, not an e-cap exactly as not polarized.
I have never tried the tube cutter (I don't have one) but use a dremmel with cut off wheel and cut a little lower than you did. My idea was to have the can slip into the lower base which is slightly larger in diameter. I take both pieces to an old combo disk/belt sander with a table for the disk and a square slide to keep it flat to the disk. I touch up each piece to square as the dremmel and my skill doesn't work that well. Then the can will slide right into the base section, a perfect seam to expoxy but the can will stand slightly shorter, perhaps 3/16".
Nice job so far and looking forward to progress.
Jerry
A friend in need is a pest! Bill Slee ca 1970.
Posts: 15,307
Threads: 532
Joined: Oct 2011
City: Jackson, NJ
I came up with idea of using pipe cutter and it works well, but one mistake I did was that I thought 1-1/4" cutter would be enough (and the price difference kept reinforcing this point of view) and it happened to be not quite enough so I have to push the cap into the cutter and it first smooshes the can, especially the aluminum one. And spending another 50 bucks for 1-1/2" one when I had already bought the other one feels wrong....
Otherwise is an excellent tool for the job.
Before I was using a hacksaw. And a steak knife (a goof Wusthoff forged sharp steak non-serrated knife. )
And, of course, Dremel with thin cutting disk.
Posts: 599
Threads: 24
Joined: Jan 2014
City: Edmonton AB CA
I have just started using a new idea for my filter caps but it does rule out using the poly caps as they are to big for this. I was using the poly caps and then using JB weld clear to glue the can back together and most times it works really good. I then had one that for what every the reason the glue would not hold. Must have had some contaminant that I missed. So I thought about it and now I cut the can so there is at least 1/2" at the base and do the usual cleaning and stuff with an electrolytic. Now the new part, I got some PVC electrical conduit from Home Depot that has the exact same outside diameter as the inside of the cap cans. I cut a piece 2-3" long and insert into the base and then slide the top on for a nice fit. Then I got some model airplane peel and stick trim in aluminum and I wrap that around the can to hold it together. It doesnt look to bad and the best part is you can take it apart with ease for furture repairs or if by chance you get a new cap that fails on the first power on, this has happened to me before.
Good luck with what ever method you choose!
Gregb
Posts: 1,562
Threads: 56
Joined: Nov 2008
City: Sedona, AZ/Placentia/CA
The problem I see with the pipe cutter is that the can is fragile and the cutter due to its design is going to have to cut a bit up the can. You will have two pieces to put together that are the same diameter. It will also due to pressure slightly (no matter how slowly tighten it) bend both pieces down a little. With the dremmel you can cut right at the top of the "bulge" at the base of the can and not do any distortion of the can. The can will then slip right into the lower base with no "smooshes". We all have our own way and each are great. That is the joy of seeing other options.
As for connecting the Positive lead out of that type of can, well, you can't solder to it from the inside, at least I have not been able to. I remove the bolt stud and the insulator and put in a nice stiff large wire with a replaced insulator that fits tight in the hole to make a fit. Often the positive stud will come out with a little coaxing and leave the rubber. Drill a small hole through the base to run the negative and run it to a good ground.
Just enjoy the trip, they look a lot better than stuffing the caps under the chassis.
Best, Jerry
A friend in need is a pest! Bill Slee ca 1970.
Posts: 347
Threads: 34
Joined: May 2007
City: Raleigh, NC
I also use a tubing cutter for e-cap cans. It gives me a nice smooth, even, cut, which I'm not able to do with either hack saw or Dremel tool. The edges of the cut are dimpled in a little, but I fix that by rolling the dimpled edges on my workbench with a short piece of scrap copper pipe. It smooths out the edges very nicely so they rejoin with only a little visible seam.
The JB Weld holds the edges together at least as well as necessary. One time I had to take a re-stuffed cap apart and re-re-stuff it (long story about a bad decision), and the JB Weld held so well that I had to use a hack saw and make an new cut to open it again. (This one was too thick for my tubing cutter.) A good argument for using metalized tape, I guess.
I nearly always clamp the restuffed capacitor very lightly in a vice until the JB Weld dries.
John Honeycutt
Posts: 15,307
Threads: 532
Joined: Oct 2011
City: Jackson, NJ
Jerry
No, actually you do not fit the two pieces of tube that are the same diameter.
I ALWAYS cut at the groove. This leaves you with one part that fits inside another.
Also there are those caps that have the groove (or a cap) on top - then I cut on top.
After that the procedure is teh same, except you have to fit the cap through the whole tub which is not as convenient, but it still works. I solder the cap, then pull it down with the wires that have been threaded through the central hole in the base, then (and I make sure there is space around the caps' contacts both at the bottom and around the caps) I flood the base with hot glue making sure it penetrates everywhere on the bottom so it then fixes everything in/ place.
Posts: 1,562
Threads: 56
Joined: Nov 2008
City: Sedona, AZ/Placentia/CA
Mike as I said, cut at the groove and the top will slide in. If you can do that with a pipe cutter, great, the OP didn't. Not sure how you can do that due to the differences in diameter. Enough said, and I'm done on this one. Every one has their ideas and if you can use a pipe cutter to cut on the "grove", well, never tried it. I just use the dremmel and cut there.
Best Jerry
PS: are you watching the Olympics? I think Russian is doing a very nice job.
A friend in need is a pest! Bill Slee ca 1970.
Posts: 15,307
Threads: 532
Joined: Oct 2011
City: Jackson, NJ
Jerry
Just to reply about "difference in diameter" (not to argue the point but just to explain).
What matters is whether the same diameter touches the rollers (and the blade is in between) - and it does. So your cap nicely rolls as you want it and the blade can be positioned at the bordering part of the narrow and wide diameters.
PS. Honestly, I do not watch Olympics, never did. I am not into sports. The fact that the Olympics are held in Russia do not make it any more interesting for me. My wife does watch it, and my son has to do some watching as they got some "progress report" on a sportsman of their choice to do as a school project (which to me is stupid - what if I do not like watching sports and am not interested - why am I then writing about something I couldn't care less about).
Posts: 1,083
Threads: 73
Joined: Jan 2014
City: Annapolis, IL
I have my caps rebuilt, but I am going to trial them before I report just how I did it. Not sure if it is the best. I have enough pieces I tacked things together and powered it up today for the 1st time. I used a variac and 150w bulb in series - just in case. Here are my findings: First attempt - nothing. My bulb wasnt in the socket tight. Second attempt - nothing. Made some checks on the power trans and found all voltages were present. Third attempt-After darkening the room, I could see the tube filaments on, but no B+. A check revealed an open filament on the 80. After some digging I found another 80, tested it and it too showed bad ... after a 3rd tube, I found the tester had died, so it was back to the ohmmeter. Fourth attempt, AH-HA! Thare IS indeed life in that there set!
My vitals are as follows: The volume control is dirty, no hum that I can hear, weak reception, but there IS reception! BUT, the only way I can get anything is to put my finger on the cap of the RF tube. The tuner is pretty quiet on lower freq's, and there is a lot of whistling while tuning. The B+ is a little high, around 280v off the final filter cap (bulb out of the circuit). That is running the radio on 117v. Our line voltage is 122v. Since my tube tester has quit, I cant test these tubes. It is an old Eico 625. I do have a set of NOS, NIB tubes on the way for this.
As of this moment, I have recapped the bakelites, electrolytics, a used 80 tube, and rewound the detector coil. I have had it on for about 30 mins, and I dont see anything running hot. No smoke, no caps blowing up, no sparks.  Thats about it. I need to wait on parts before I can do much more. But, this is what I have as of now.
If I could find the place called "Somewhere", I could find "Anything" 
Tim
Jesus cried out and said, "Whoever believes in me , believes not in me but in him who sent me" John 12:44
Posts: 15,307
Threads: 532
Joined: Oct 2011
City: Jackson, NJ
Tim,
Good, it is alive.
Next time MAKE IT A RULE to test all tube before putting them in: you got off cheap compared to what could have happened.
Now, looks like you could use an alignment.
Surprisingly mine works just fine ( no it does not justofy no alignment and it will be done) despite the rewound coil ( I did dnot expect that coil to influence alignment but still).
As for the volume pot, I sprayed Deoxit right into the leads' rivets' holes, liberally....no scratching anymore.
Users browsing this thread: 1 Guest(s)
|


